In other news…Life keeps getting in the way…

Wow, my poor sadly neglected blog.

I honestly don’t know how people regularly keep up with these things. They are so much work…

My life has gotten all of the sudden CRAZY hence why I haven’t been blogging. I’m finally working semi regularly (At least 5 days a week) which has been awesome! But I had forgotten how much working takes out of you…I get home from work and all I want to do is relax…Blogging is usually at the back of my mind. Also I have a HUGE announcement. I have decided after over a year of deliberation…to Transition. For those of you who don’t know what that means. in short form it means to medically change my body, and my social role from Female to Male. Its much more complex than that…but that is the basic definition. That has taken all of my time and energy…just getting everything set up to start the medical aspects (especially for someone who doesn’t have Health insurance…it is really complicated.) and then on top of ALL of this. I had complications with my Snap program benefits, and couldn’t purchase fresh food this month. So I didn’t really have much to blog about. But I FINALLY got that sorted out, so we have fresh produce in the house again! yay!

To celebrate being able to buy food again. I bought some shrimp, potatoes, ginger, and cilantro 2 days ago. and made my infamous Curry.

I usually make it with chicken so I was apprenesive about using shrimp but Beth LOOOOOOVES shrimp so I decided to treat her, and give it a shot.

It turned out AMAZING.

Heres the recipe.

Thai/Indian curry base (add protein…I used shrimp this time, but Chicken is great, and Pork works well also)

4 Portions              Cook time: about 45 mins                  prep time: about 20-30 mins

1/2 Onion Diced
2 Cloves Garlic Crushed
1 small knob (about 1/2 tablespoon) Fresh Ginger Minced
2 or 3 Potatoes
1 Can diced tomatoes
1/2 to 3/4 teaspoon (depending on house spicy you like it) Thai Kitchen RED curry paste
1 – 2 teaspoons Yellow Curry powder
1 teaspoon Cumin
1 Can Coconut Milk (NOT the low or reduced fat kind…yuck.)
1/4 cup cilantro (or how ever much or little you like…I like A LOT!)
1 fresh lime

With Chicken: Add 2 small Chicken Breasts

With Shrimp: Add 1/4 Lb Shrimp

1. In a med sauce pan sweat the onions and garlic in 1 teaspoon olive oil

2. add ginger and potatoes sweat the ginger until it becomes fragrent.

3. add the curry paste and spices

4. add the tomatoes and coconut milk

5. Simmer until the potatoes are soft (about 30 mins)

6. Add the cilantro and lime

7. Serve IMMEDIATELY. with Rice and Naan.


If you are adding a protein I usually cook about 3/4 of the way separately in a small amount of olive oil and curry powder. When usuing chicken. Cook separately, allow to cool, shred with a fork or your fingers (but I am not very patient and end up burning my fingers) then add to the curry base when you add the lime and cilantro.

If you use shrimp, remove the shells and tails and add RAW when you add the cilantro and lime if they are small to med sized shrimp they should cook in about 1 minute and 30 seconds.


Sorry no pictures this time. :/


Just fyi this makes FANTASTIC LEFTOVERS!

its been a while…I know…heres why.

Ok so Beth and I are always talking about losing weight and getting healthier (not that she needs to lose weight because she’s rail skinny…but she does want to get in better shape) but we have a hard time following through. Life always seems to get in the way. When you live as hectically often moment to moment as we do, it is so difficult to keep track of calories, 5 meals a day, and an exercise plan. So in an effort to actually follow through, heres what we are doing.

First…we bought an exercise dvd set…and not just any dvd set…no Beth’s outlook on life is “Go big or Go home” so we bought “INSANITY” the HARDEST and most intense work out DVD set on the market. It promises if you actually do it you will be in the best shape of your life in 60 days…Well after doing the Fit test at the beginning I’d believe it. I am sore today after just 25 minutes yesterday. It is crazy. Heres a link if you wanna check it out for yourself. http://www.beachbody.com/product/fitness_programs/insanity.do?code=SEMB_GOOGLE_SAN&extcmp=gd05bbe2dc2c4090&s_kwcid=TC|17312|insanity%20workout||S|e|11395391173&gclid=CJGAg6rJ-7ECFSXZQgodG2kAFg

Included in the package is the “Elite Nutrition” booklet. Outlining how to eat 300 calorie meals 5 times a day, how to find your personal Calorie intake daily limits. and How to plan your meals.

So me being the cook of the house decided to take on the endevoire of planning our meals for 2 months starting on september 1st.

Heres the thing though. If I’m going to eat like this for the rest of my life, I sure as hell better find more recipes then just the 5-10 they’ve outlined for every meal in this little booklet. So then I ran into the question…well how do I know if what I’m making is under 300 calories? I’m not a nutritionalist.

There in lies the problem of EVERY diet plan I’ve ever seen. No one ever teaches you how to figure this shit out for yourselves. They provide you with recipes and tell you to go for it…but what happens when you get tired of eating the same 10 things every week?

Well never fear my friends, I am determined to figure this out…and I will share with you my knowledge as I learn it.

So first…To make a well balanced meal the goal is
40% Protien
40% Carbs
20% Fat

but really what does that look like…? Most of us know what proteins look like, but many of us have no idea what good carbs look like or what is good fat and bad fat and everything in between.

well let me just list off a few surprising ingredients that fall into different categories than you might have expected.

Vegetables:
Bell Peppers = Carbs
Broccoli = Carbs AND Protein
Carrots = Carbs
Celery = Carbs

and so on…pretty much ANY and EVERY vegetable you could think of is considered a carb…but a good one at that…and heres why…

Carbohydrates are what give your body energy, they are the bases to our fuel. Without healthy carbs in our diets we would have little to no energy. When good carbs combine with lean protein it makes for the highest and longest burning fuel for our bodies. This gives us energy and stamina throughout the day. Not to mention vegetables are PACKED with vitamins and minerals that are just down right GREAT for our bodies. Because Vegetables naturally have little to no fat components (some have high sugar content, which can turn to fat if we’re not careful) they are considered low calorie, which means you can eat more, and still lose weight. The reason that people think Carbs are bad, is not because of the actual carb itself but what often comes along with the carb in things like bread, starchy foods (potatoes) and sweet foods like cookies. Its the fat, sugar, and startch, that kills the goodness of the carb.

Because carbs are a long burning fuel in our bodies, if you are active carbs help give you energy throughout the day and your body will continue to burn them until you run out. But if you are not active, your body will store them for later. In our bodies process, it is basically storing up for a later use. However if we are not active generally at all…this storing carbs to be burned later, is actually what makes us fat. I think of it as like preparing for the worst. Your body assumes that you will need this later, so instead of burning it off (because you’re not requiring it) it thinks “oh well I guess we’re just saving it up for something special)

This is why in the beginning of an exercise/weight loss program it is SOOOO important to eat as low in the calorie count as possible and stay as active as possible. You want to give your body fuel obviously but if your chubby like me, your muscles ALREADY have plenty of fuel stored away…You want to fuel your body with your stored (carbs) Fat first…

I don’t know if this makes sense to anyone else. But it makes sense in my brain.

OK so thats all I have today…Check back tomorrow for my first real workout day…and starting on september 1 I will outline our menu and budget for the month, and probably post my scary before picture we had to take for INSANITY.


Back to reality.

This past week was wonderful…a blissful “vacation” getaway to the scenic destination of Land Park, just a short 5 minute drive from downtown Sacramento, but worlds away. Really. House sitting for Beth’s Aunt was truly such a gift to us…While Beth still had to work during the week, I spent my days lounging by the pool and sipping an endless supply of Ice cold Sprite (which just so happens to be my FAVORITE soda besides Sun Drop!). We ate FABULOUS Food, and watched LIVE TV for the first time in probably 2 years. We slept in a California king sized bed that was so soft and pillowy that it literally felt like you might be swallowed whole. We hot tubbed every single night, and swam in the pool on the weekends. AAAAND to top it all off I got to watch the Opening Ceremonies of the Olympics 2012, on LIVE TV…which as my mother can tell you, is my FAVORITE part of the Olympics, I LOOOOOOOVE the parade of nations!

aaaand now, we are back home. Back to our tiny but comfortable apartment, back to hulu or olympics online, back to my pathetic excuse for a stove, and back to our double bed….not even a queen size.

But alas This is a cooking blog…enough of me complaining lets get to some eats.

As I’m sure most of you have experienced coming back from vacation can be nice, that wonderful “ah back home” happens as soon as you enter the door. But coming home from vacation even if its only a week long trip like ours was, has its challenges. Mainly for me, in the area of What to make for dinner…

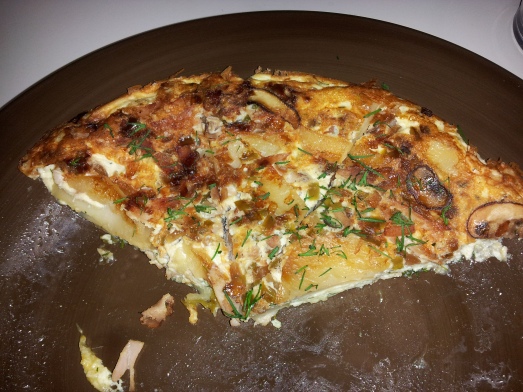
We arrived home sunday night after dinner, so Monday was really the first chance I had to cook anything. I opened my fridge and to my extreme disappointment, I saw….very little. My fridge contents were mostly soggy and some things had gone bad so it smelled all together unappetizing. But somehow I managed to scrape the bottom of the barrel and find the ingredients for a tasty fritatta.

Now if you have never had a Fritatta, think of it as a crustless quiche, or an unfolded Omelet. it is a simple italian dish…with endless room for creativity, and it is also VERY forgiving, it is almost impossible to screw up a fritatta.

So here is what I made…and let me just say, it was SO good.

Dilled Turkey and Potato Fritatta

1/2 Red Onion (diced Small)
1/2 Green Pepper (diced Small)
4 Baby Bella Mushrooms (sliced thin)
6-7 Slices (good) Smoked Turkey Lunch meat (bitesized pieces)
2 Small red Potatoes (peeled and sliced thin)
3 eggs
1/4 cup low fat sour cream
A splash of milk
a handful of Dill (chopped)
1/2 (or more) Shredded Cheese

1. Preheat your oven to 375 F (make sure you use an oven safe saute pan for this recipe)

2. Put a small pot of water on the stove to Par Boil the potatoes (Par Boil: To pre cook in Boiling water)

3. melt a small knob of butter in a 10′ saute pan, add onion, green pepper,  and mushrooms. Saute on high for a few minutes to brown the veggies, then turn down and cook until the veggies are soft.

4. When your water is boiling add the potatoes, and cook for about 1-2 minutes, just until the edges are soft.

5. add the potatoes and turkey to your veggie mix.

6. add your 3 eggs, sour cream, milk, dill, and shredded cheese in a bowl and mix together well.

7. once the turkey and potatoes are warmed and slightly brown, add the egg mixture. Cook on medium to high, until the edges are lighter in color, and slightly firm. Don’t worry about the middle being raw, it will cook in the oven.

8. Place in the oven, for about 20 minutes.

9. Remove from the oven, and flip onto a plate, This is easiest to do by placing a plate on top of your saute pan (like a lid) and flipping the saute pan over with the plate still on top when you remove the pan you will have a perfectly flipped fritatta.

Heres what was left of ours. 🙂 Enjoy!

House-sitting…its like vacation.

Well hello,

I know it has been quite some time since my last post, and I do offer my deepest apologies. The fact of the matter was last week was beth’s birthday and I was so busy being an awesome wife and making her birthday week the best ever…that I totally forgot to blog. But now that the birthday has passed, things are almost back to normal…except for one thing…We are HOUSESITTING this week!!!! IT IS AWESOME. This house has a pool, one of those rain shower head things, multiple tv’s with DirectTV aaaaaaaaand A BEAUTIFUL KITCHEN…complete with Viking stove, Butcher block island, and 2 french door refrigerators….which are both FULLY STOCKED… Aunt Mary (its her house) gave us instructions to EAT as much food from their fridges as we could while they are away…SO we are doing just that. Last night I made Crab Cakes (OMG….) They were amaaaaaazing. And tonight….I am making Greek Quesadillas, with Sour Cream Tatziki and a fresh corn salsa 🙂 Be on the look out for those recipes which I should be posting by tonight 🙂

Seriously though this is like vacation for us, except its free…and there are a lot of animals to take care of. but besides that…its vacation…I highly recommend housesitting for your well off relatives whenever possible.

Apartment Kitchen’s 101

I thought I would take a few minutes to talk about my kitchen, I like most Chefs have a dream to one day have a beatuiful state of the art masterpiece kitchen in which to make my nightly creations…

Dream………..Luxury Apartment Kitchen

vs…

My Apartment Kitchen.

As you can see…not exactly state of the art, and its kind of cramped…but I consider it a masterpiece…and it is my favorite kitchen so far…because it is functional, it is fluid and it is all together pretty darn nice to cook in. Plus the gas stove…I love gas stoves. It was hard to get this kitchen functional, we’ve lived in our apartment since march…and I am just now getting the kitchen to where I feel it should be…heres how I got there….


Today’s post is a series of tips and tricks to help you my dear readers Utilize your Small Kitchen to its FULLEST Potential.

Beth and I live in a small one bedroom apartment in the heart of midtown Sacramento. Thankfully it is an actual one bedroom and not a studio, I don’t know that I could function in a studio kitchen. Anyway. Our Kitchen is small but very functional thanks to a great layout, some proper planning on my part, and some creativity on Beth’s Part.

1. Avoid putting items (Blenders, Coffee makers, Mixers, Utensils, Etc…) on the counter.
This doesn’t need to be permanent. I personally like to put as much in cabinets as I can. This is due to the fact that items have a tendency of making their own mess when i am cooking. I don’t do it i swear…stuff just multiplies all over the counter by itself…Anyway…The Items I have out on my various counters are: (Back counter) The Coffee Pot (an everday necessity as I’m sure you’ve learned if you’ve read about Beth and her coffee Addictions…), Coffee Grinder, and Sugar Jar (this is my requirement for coffee…and really its not supposed to stay on the counter…but it does during the week because I’m too lazy to put it back in the cabinet every day…lol) (Front Counter Bar) My Kitchen Aid (which stays out both for functionality and for ascetic appeal…its vintage and very pretty.), the Fruit basket and Bread Basket.

I don’t believe in putting utensils or Knife blocks on the counter because lets face it, they just get in the way when usually you only need 1 or 2 at a time. I also don’t put my toaster or microwave on the counter, this just comes from lack of space really and I don’t use either of those items on a regular basis so why waste space?
* on a side note, my mom has her microwave in the pantry, which I thought was a really clever place to put it. When my parents remodeled the kitchen and built the beautiful pantry my mother now enjoy’s she had them place an outlet in the pantry specifically for the microwave. Genius. really.

2. Make GOOD USE OF DRAWERS…they are amazing…really…
I know easier said than done right? I am of the personal opinion that all items that can go in a drawer should go in a drawer…If I had enough drawers my pots and pans would go in drawers too. but for now I have this…
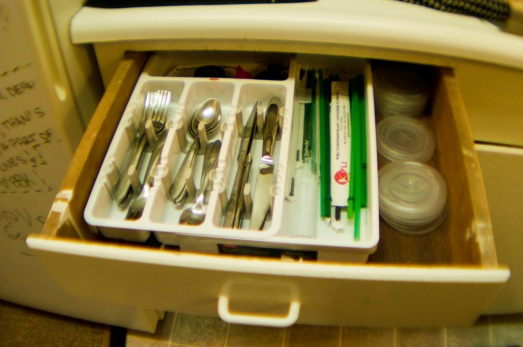
Drawer 1: (to the left of the sink) Sliverware, Straws, and Lids. Also the occasional pair of chopsticks and other random “eating utensils get thrown in there as well.

Drawer 2: (below drawer 1) Utensils as you can see it is currently poorly organized…but hey there all in the same place and there is nothing sharp in there…so I’m good with it.

Drawer 3: (Under drawer 2) Plastic Bowls, Cutting Boards, (usually although not currently pictured) Liquid measuring cups, and Awkwardly shaped utensils
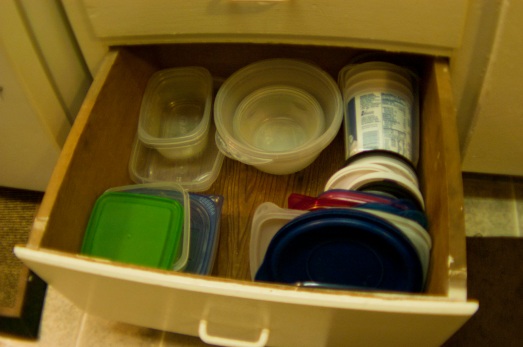
Drawer 4 (Under drawer 3): FOOD STORAGE!

Drawer 5 (to the right of the sink) Knives, Spices, Measuring spoons, xacto knives, corkscrew.
I like to keep ALL the sharp objects together…I figure I am less likely to impale myself this way (or maybe more likely now that I think of it…)

(Sorry for the blurriness of some of those pictures…my 55 mm lens can only do so much…even with the fish eye)

As you can see above I have 5 drawers total in my kitchen and not one of them is the dreaded kitchen “junk drawer” that seems inevitable in almost every kitchen I’ve ever been in…and I know what your about to ask…”but where do you put the batteries?!” and honestly thats a good question…when I remember where I’ve put them I’ll get back to you.

*Beth Says “I put them in the utility cabinet, which contains: Cleaning supplies, rags, extra ziplock bags, garbage bags, vacuum cleaner bags, Light bulbs and Batteries. This makes perfect sense” It also makes perfect sense why I didn’t know where they were ;p

Anyway…I hate a cluttered kitchen…everything should have a place and that place should make sense to you. If you don’t like drawers…don’t use them. I’m just suggesting that they are extremely functional for more things than just silverware and batteries. 🙂

3. Make good use of your Cabinets

Again easier said than done but it can be super helpful when you get a good system going. Again I would suggest going with what works best for you. There is no formula to solve a crowded or cluttered kitchen. I have found that taking ideas from someone else and adapting them to your own style is the best way to start.

Cabinets are great, but they are also deceiving. when I see a bunch of empty cabinets in a kitchen I am moving into I ALWAYS think Oh man, this is great I can totally fit everything in these bad boys…but then…about halfway through unpacking I realize how dysfunctional it is, and how half of the really important “cabinet items” i.e. cups, pots, pans etc…are not going to fit. I usually have to re-organize my cabinets 2 times before getting them right. Therefore I suggest THINKING before unpacking…just don’t get to excited about the “gobs of space” you feel like you have, plan your kitchen before you unpack it. This is my current system:
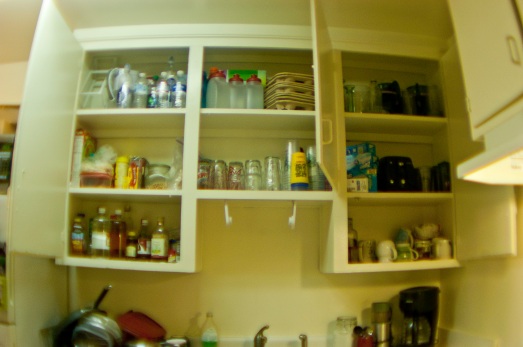
Cabinet 1: (left most cabinet pictured) Liquids for sauces bottom shelf (due to the fact that I am short and need to see the labels) Above that is dry goods (snacks, cereals and cookies) above that is storage (because only beth can reach this shelf)
cabinet 2: (middle cabinet) Cups cups and more cups bottom shelf, above that is more storage (little money saving tip…those bottles with the red lids cost about 3 dollars each and make great water bottles, and also fit perfect on the bottom shelf of most fridges)
Cabinet 3: Bottom Shelf: Coffee Mugs and Coffee Beans, above that is the toaster, travel coffee mugs, and Ziplocks (I know random placement but I tried putting them elsewhere and it just didn’t work…I use them just about every day…so I need them readily accessible)
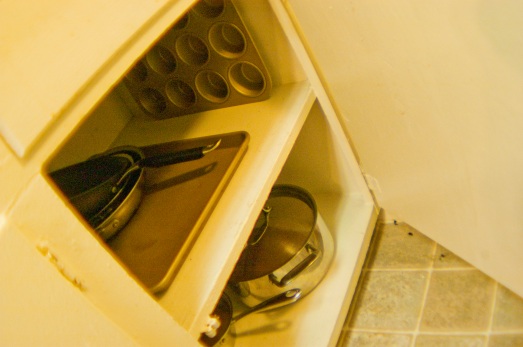
Cabinet 4: (Below the knife drawer) Pots and Pans, and Baking sheets.

Cabinet 5: (Below Front Counter Bar) my “Mini Pantry” Specifically for dry and canned goods used in cooking. e.g. Beans, rice, pasta, etc…

Cabinet 6: (Above the stove) I’ll admit I forgot to take a picture of this one. But it holds my glass bakeware, bread and cake pans, extra utensils for my kitchen-aid, and my beloved Cast Iron Skillet.

On a functionality basis this works very well. The only problem with my current cabinet set up is my pots and pans cabinet happens to have only about 1 1/2 of space for the cabinet door which would be fine…except there is also a trash can there, so to get out the larger items (large saute pan or baking sheets) I have to move the trash can. Really no big deal though.

The final tip I have is this if you have the space…USE A BOOKSHELF (Specifically The Ikea Expedit bookshelf or something like that…I can’t remember the name…ask Beth)
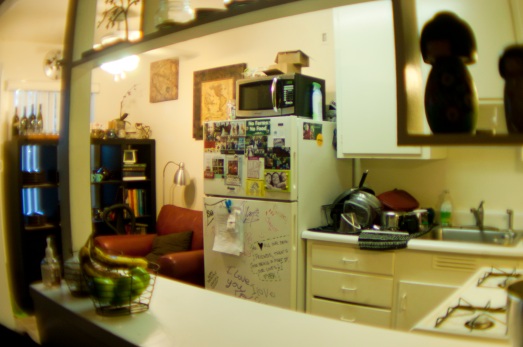
its that big black thing on the left

This was where Beth’s Creativity came in, because I’ll admit it, I was skeptical…I thought the idea of a GIANT bookshelf in the kitchen was kind of weird and that it would look stupid…but I trusted my wife (life lesson: Your wife is smart…trust her…:p) Turns out…it is awesome…it looks a hell of a lot better than industrial looking wire kitchen shelving units. and it acts as an extra pantry (black bins at the bottom there are 4 total) a china cabinet (4 cubes with our plates and stuff) display case (My collection of tea pots and tea cups) and bookshelf (4 cubes of cookbooks)

This was probably the biggest space saver for us. Can you imagine what the kitchen would have looked like if I had to cram all this stuff into just 6 cabinets and 5 drawers. Wow! We added the bookshelf at the cost of a kitchen table…which is not that important to us..we have plenty of comfortable seating in the living room. If we didn’t have the massive red chair (which our princess puppy Scarlet is incredibly attached to) we would have room right there for a bistro sized table…but the red chair serves as a great little book nook for me, I sit there and look at my cookbooks and cooking blogs when making my weekly menu’s.

So there you have it. My tiny kitchen made Functional. I hope you find these tips helpful!

Please write me below if you have any comments or maybe addition questions about this topic or others I’ve shared before…and as always

Let your Adventurous Chef Thrive

~ Chef S.

Beth’s Birthday Week Menu 7/11-7/17

Ok well Beth’s birthday isn’t technically until the 19th, but since budgets are tight and I won’t be able buy Beth a big expensive birthday present like I would like to, I have decided to stretch her birthday out over the next 8days (ok so a little over a week) and give her all of her favorite meals I make, and continue the 23 things I love about my wife project 🙂 Here is a menu of mostly her choosing with a few surprises by me thrown in there…

Its Hard when you love someone so much, that you literally want to give them the world, but can’t afford even one nice expensive dinner at a classy restaurant for a birthday dinner. But as I am learning, sometimes the one you love doesn’t need fancy things, or expensive dinners…all they need is a small gift thoughtfully purchased (or made) and wrapped in love. (cheesy I know) I know this is true for Beth, especially this year, I think me NOT breaking our budget and spending tons of money on her, means more than anything else. Its her money anyway since I am still out of work. I would encourage those of you with a tight budget and even those with looser (or no) budgets to think about doing the small things for the ones you love, instead of just buying them gifts. Write love notes, Bring her/his coffee at work, make her/his favorite dinner, rent her/his favorite movie, Make a mix tape (or cd) of songs that make you think of her/him. Do something out of your comfort zone for your partner. For me this includes: Cleaning the house (which I know how to do, I just really don’t like doing it.), Making her favorite desserts (I suck at baking but I am learning because she has a massive sweet tooth…lol), Write Music and poetry (Beth has always told me she wants to be the girl someone sings about, so I have been trying for the past 2 years to successfully write a song that doesn’t sound stupid…I have not accomplished this goal…I SUUUUUUCK at writing songs….I’m just too sappy). These are just ideas, it really all depends on what means the most to your partner/significant other…make a point to learn those things, then Get creative, and show her/him, how important they are to you!

Ok ok enough of the speech…Heres Beth’s Birthday Menu

Wednesday: Dinner at Aunt Mary’s

Thursday: Twice Baked Potatoes and Caesar Salad with Grilled Chicken

Friday: Leftovers

Saturday: Mandarine Chicken Salad

Sunday: BBQ Chicken Pizza

Monday: Leftovers

Tuesday: Shrimp Alfredo and Veggies 🙂

In addition I am hoping to try and make a pie at some point this week, as well as trying my hand at pickling green beans via the refrigerator. Be on the look out for some fun posts this week!

Let your Adventurous Chef Thrive
~S.

Craving Carbonara? I have a great recipe for you :)

Today is the 10th, obviously…reason I mention it is this…in exactly 9 days My Wife will turn 23, so I have decided to do a fun little inexpensive (cuz we’re still broke…lol) present for her that will span out over these next nine days…I am calling it…the 23 reasons I love my wife project. So to kick things off today I bought her 6 chocolates from Ginger Elizabeth’s (an amazing specialty chocolate’s shop in down town sac…) with a little card that said “Reason #23 why I love Elizabeth Kelly” inside the reason was “Because you are a Ginger Elizabeth” hehehe I find myself so clever.

Just thought I’d share. 🙂

Anyway…On to the FOOD!

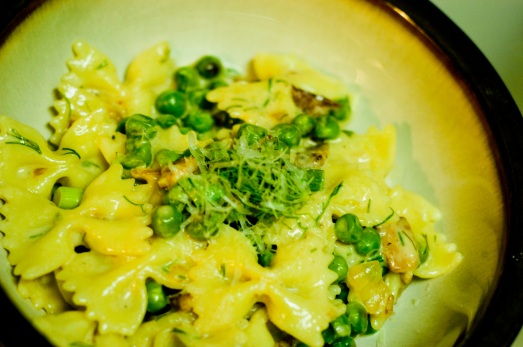
As I said in my last post, Carbonara is not exactly the healthiest of meals, but since I love it soooo much, I wanted to make it a wee bit healthier. In the end, it did taste a lot lighter (I’m not sure if it was in fact healthier but I felt better about eating it) and didn’t feel as heavy after we had eaten. Boy was it still delicious though, creamy and salty just the way carbonara should be!

~Pasta Carbonara Ala Sarah~

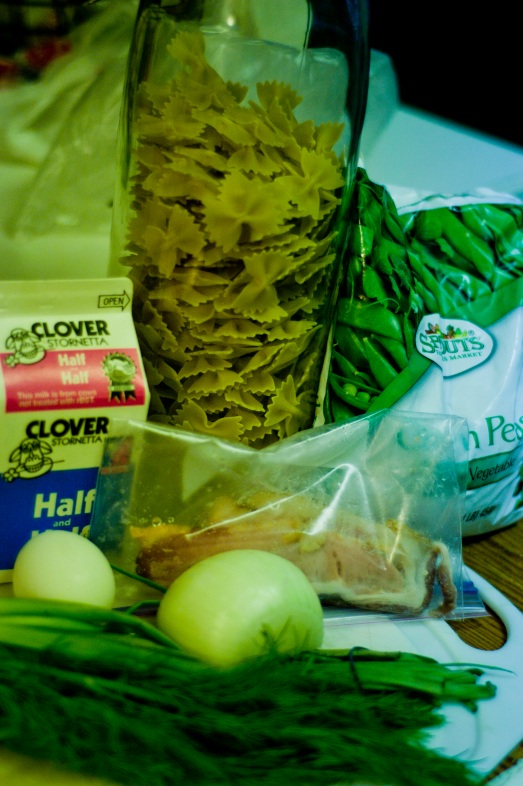
Ingredients:

5 or 6 handfuls of Pasta (I used Farfalle…Bow Tie Pasta)
1/2 Onion
1 Slice Bacon
1/2 Cup Half and Half
1/2 Cup 2 % Milk (Not Pictured above)
2 eggs
1/2 Cup Parmesan Cheese (Not Pictured Above)
2 Green Onions
1/4 Cup Dill
2 Cups Peas
Salt and Pepper to taste
1. Chop the onion finely and slice the bacon into small pieces. Saute together in a large (12″ or larger) Non Stick Saute Pan, until the onions are soft and slightly brown and the bacon is browned

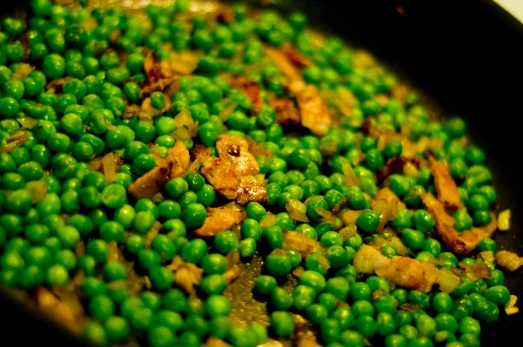
2. Add Peas to the onion bacon mix and saute until the peas are cooked. Cook pasta at this time as well.

3. Mix Milk, Cream, Eggs and Cheese in a small bowl along with some seasoning (Salt and Pepper) and your herbs and green onions!

4. Drain your pasta and add it to your peas and bacon mixture. make sure your pasta is REALLY HOT before moving on to the next step

5. Once your pasta is HOT, TURN OFF THE FLAME OR HEAT TO THE PAN! Then add the egg mixture

6. Stir carefully but briskly. The key here is to keep the egg mixture moving so that it cooks but you don’t end up with chunks of scrambled egg in your pasta, so keep stirring until the sauce is thick.

Viola PERFECT light Carbonara with a yummy twist!

Enjoy!

~ Let your adventurous Chef Thrive!

S.

Super Saturday budget friendly tips!

Well well well, here I am back again. For the 3rd time this week I think? I feel very impressed with myself. So why another post you might ask? Well I am sitting outside enjoying the weather and a lovely iced coffee. My wife is on her computer blogging away, and has been for well over an hour, almost completely in her own little world, I have begun to feel lonely. So I’m turning to you blogsphere in the hopes that by the time I am done writing this Blog Beth will be done with her’s and we can hang out :).

Todays post is all about homemade products vs. Store Bought “Premade” products.

While I am a fan of some store bought premade products, like mayonnaise or the occasional box of mac and cheese. By and large I believe it is almost as easy and much cheaper to make many common items at home.

for example: Pizza Dough

Store bought fresh or frozen RAW pizza dough from Safeway is usually $3.99 for enough dough to make 1 medium sized pizza. More than enough for 2 people. While this method is still cheaper than buying a pizza from a restaurant or a frozen pizza from store. Pizza Dough is ridiculously easy to make and cost less than a dollar per medium pizza. Heres how I make a yeastless dough (which is basically just flat bread dough…but still really delicious)

Flour
Salt
Milk or water
oil

thats it. Basically I put about 2 cups of flour in a bowl a few good pinches of salt and I add enough milk to make it a sticky dough. then I add a good glug (i know real technical with my measurements.) of olive oil to make the dough less sticky. then let it rest for about 10 to 15 mins in a warm environment. then roll it out, dock the dough with a fork *docking means to poke a few holes in the dough to allow the steam to escape* then top with whatever delicious toppings you like. Bake at 350 to 400 degrees

Pretty much easy peasy right? and since ALL of those Items are staples in my kitchen anyway (If you would like a full list of my pantry staples check out Whats in my Pantry?) our weekly pizza nights are pretty much free. This also has the benefit of health control, making your own pizza allows you to use whole wheat flour, low fat cheeses, and healthy toppings. 🙂

The last benefit to making your own pizza dough and all is it gives you complete creative control. This allows your adventurous cook to come alive, Pizza is one of the best mediums for discovering new flavor combinations. Because lets face it, almost anything tastes better with some cheese. For example just last week, I made a plain pizza dough with Caramelized Onions, Bacon, Sage, Tomato and Havarti Cheese. Not the healthiest thats for sure but my God was it delicious.

Another great example of making your own verses buying it made is Tomato Sauce. (while I do buy the stuff in the jar for emergency last minute meals) It is SOOOO much cheaper to make homemade Tomato Sauce, and SOOO easy. Heres the thing you can make it one of 2 ways.

First way is to take a bunch of Roma or Beefsteak tomatoes, and stew them for up to 6 hours in some water or stock until they become ridiculously soft and delicious. Puree them up and then cook the tomato puree with some garlic, white wine and basil for about 2 hours.

ORRRR…my personal favorite way…is buy those cheap cans of Tomato Sauce (plain) for about $0.85 a can.

I usually use at least 2 when making tomato sauce. With about 1/2 cup of white or red wine. 3 or 4 crushed garlic cloves and a heap of basil. I simmer that for as long as possible adding only about 1/2 of the basil in the beginning. then mix the rest of the basil in right before topping the pasta or whatever I’m making.

Again one of the major benefits to this is customization. You can add cheeses, veggies, meats, and flavoring liquids in endless combinations to create YOUR perfect sauce.

In the end I usually end up with an extra jar of sauce (which keeps in the fridge for up to 2 weeks.) suitable for pizza, pasta and other delicious dishes. and it ends up being just about $2.00 for a the sauce for the initial meal, and at least 4 more.

Now if you want to get really crazy, Invest in a canning kit. Then you can make your own sauce, and store it for months! Saving you in the end a buttload of money (there again with those technical terms)

I have yet to dive into the canning world, but I really want to, especially pickling. Oh man do I love me some pickled green beans, but thats a whole different post.

Some excellent books on the subject of “Homemade ingredients” are:

Jam It, Pickle It, Cure It: And Other Cooking Projects

by Karen Solomon

Jam It, Pickle It, Cure It: And Other Cooking Projects

The Complete Book of Butchering, Smoking, Curing, and Sausage Making: How to Harvest Your Livestock & Wild Game

By Philip Hasheider

The Complete Book of Butchering, Smoking, Curing, and Sausage Making: How to Harvest Your Livestock & Wild Game

Artisan Cheese Making at Home: Techniques & Recipes for Mastering World-Class Cheeses

by Mary Karlin

Artisan Cheese Making at Home: Techniques & Recipes for Mastering World-Class Cheeses


So that is all for this post today, but I am interested to know What products you make at home?

Let your adventurous cook thrive

~ Chef S.

Well this is a little late…

Happy 4th everybody lol

So with this week having a major national holiday smack dab in the middle of the week it has thrown off my schedule. I did not make it to the store on wednesday obviously…So now I am making a last minute run to stock up on fresh veggies and necessities to make it through to next wednesday. This weeks menu is going to obviously be a little short. But here it is none the less

Friday: BLT’s with Egg (If you’ve never tried a bacon lettuce and tomato sandwich with a fried egg in the middle DO IT NOW! it will change your life)

Saturday: Asian Chicken Salad

Sunday: Homemade BBQ Chicken Pizza and Movie date night

Monday: Penne Carbonara with Peas and Salad

Tuesday: Leftovers 🙂

Heres my grocery list:

eggs
butter
Yogurt
Cream
Parmesan Cheese
Mozzarella Cheese

Lettuce (x3)
Green Onion
Red Onion
Sugar Snap Peas

Raisins
Honey
Manderine Oranges

Chicken and Turkey if they are on sale.

Budget: $30


Update: Well I’m back from the store and guess what the trip came in at :$30.73 🙂 AND I got a few extra things that were on sale. So here is the breakdown of what I purchased

1 PINT Organic Milk $2.59 (I got really excited and had to buy it because there on the front was Beth’s Cousin Zeb and Wife Meridith. 🙂 In case you didn’t know Beth’s family owns and operates a large Organic Dairy Ranch in Central California.)
Half and Half $1.19
Parmesan $2.34
Shredded Mozzarella $3.05
Darigold Butter $2.99
Medium Eggs $1.59

Bananas (On sale at $0.59 lb) – $1.36
Pineapple (On Sale) $2.99
1 lb Carrots (On Sale) $0.69
Green Onions $0.59
Iceberg Lettuce (On Sale 4 for $5) $1.25
Romane Lettuce (On Sale) $0.88
Red Onion (On Sale $0.77 lb) $0.50
Ginger $0.20
Roma Tomatoes $0.74
1 Cherry Fruit Leather (I was hungry) $0.50
Raisins $3.29
Honey $3.99

So there you have it. Total: $30.73

Alright, Well its time for this chef, to get into the kitchen!

Be on the look out this week for a few new recipes I am planning on posting at least 1 for my version of Pasta Carbonara. A Lighter healthier version, hopefully.

Keep up the Good Cooking and I’ll be back with recipes in a few days!

2 new Recipes for your Summer Time Meals!

I’m not going to lie one of my favorite foods during summertime is Potato Salad. I love a great potato salad but honestly if its always the same mayonnaise based dish it can get heavy and old. So back when I was cooking for “Sunday Night Dinners” with some friends at Southeastern I created this recipe, and it has become one of my favorite “Summertime” side-dishes. It is light and flavorful while still fulfilling that starchy need when eating a burger or grilled chicken, or is delicious just on its own as my friend J.D. who is Vegan can attest to.

Warm Dill Potato Salad with Lemon Vinaigrette.

4 good sized red skinned potatoes (washed and cubed)
1 handfull Dill (minced) and by handfull I mean a good amount enough to coat each potato with a generous amount of lovely green flecks
1 1/2 Fresh Lemon (Juice)
Olive Oil to Coat
Salt and Pepper to taste

1. Cube up your potatoes and get them in some boiling water. Cook for about 15 mins or until Soft.

2. When your potatoes are ready mix the potatoes dill, lemon juice and olive oil in a good sized bowl. You want the potatoes to just start to break apart, creating a slightly “sticky” and thick salad.

4. Season to taste and BAM delicious super easy potato salad.


The second recipe I have for you is a new one for me. I have never Roasted tomatoes, never even really considered it. But As I was searching for new things to try for our menu last week, I came across a recipe for these little beauties and the recipe said “they are like sundried tomatoes only better!” I was immediately curious. Making them this week I found that not only are the super easy and make your house smell devine but they do indeed taste like Sundried tomatoes only better! Here is my adaptation of the Recipe I found this week.

8 – 10 “Super Cherry” or Small Beefsteak tomatoes (Cored and de-seeded)
4 Garlic Cloves (Skinned and Cut in Half)
4 Sage Leaves (Ribboned)
Olive Oil to Coat
Salt and Pepper to taste

1. Ok First pre-heat your oven to 325

2. Core and Deseed your tomatoes. To Core the tomato, take a paring knife (or small knife) and cut around the stem at a downward and inward angle. To de-seed the tomato stick your finger in the hole (created by coring) and find the hollow “Seed Cavities” of your tomato, using a hooking motion with your finger loosen up all the gel seed goop from the side and bottom of the tomato, then flip the tomato out so the hole is facing your cutting board and give it a few good shakes (trying not to fling seeds everywhere.) you can also use a bowl to catch the seed goop so it doesn’t run all over your cutting board. Repeat this process with all 4 seed cavities. Depending on how deep you cored your tomato You may have to poke your finger through the meat at the very top to find the cavities.

3. Place your cored and de-seeded tomatoes on a Shallow (1/4 inch or less) baking sheet. And drizzle olive oil on top of them.

4. place a few sage ribbons down in each tomato then sprinkle the rest on the outsides of the tomatoes.

5. Poke a half clove of garlic into each tomato

6. Sprinkle salt and pepper on the outside and down into each tomato (be careful not to over do it)

7. Bake for about 1 1/2 hours or until very soft and shriveled looking.

8. Eat with a delicious sandwich or Salad or pasta or pizza or pretty much ANYTHING or you can puree them up with the garlic you cooked inside them and use them as a lovely paste for sauces, soups or just plain on toast!

I used both these recipes for dinner last week our meal was Light Tuna Melts (which were DELICIOUS), Warm Dill Potato Salad and Roasted Tomatoes. 🙂


Enjoy!